What is Nextyourcontent.com Redirect? And how does it work?
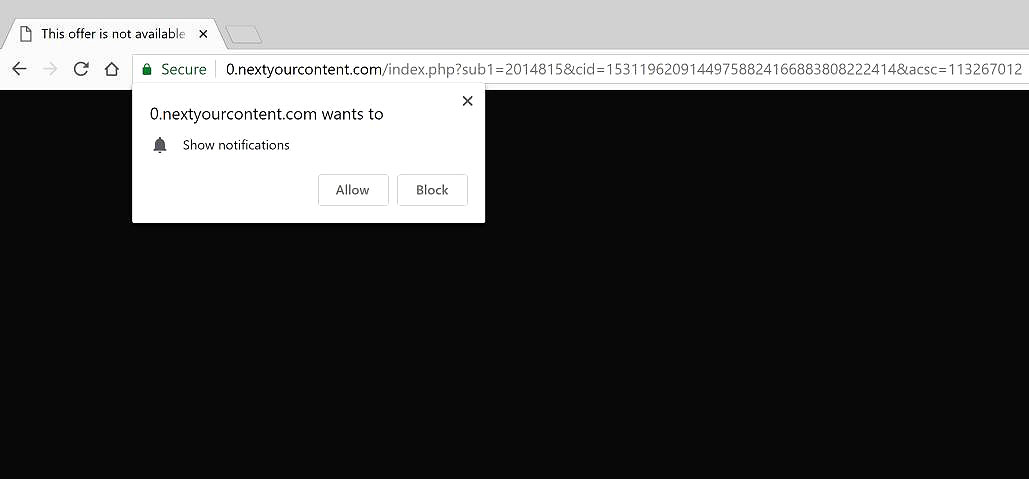
Nextyourcontent.com is yet another browser redirect discovered lately that you could visit inadvertently as you browse the web or when you click on some ads online. This dubious website displays a pop-up dialog box that has a message wanting users to click on the “Allow” button to continuously get notifications from Nextyourcontent.com.
And when you do, not only will you get notifications from this site but you will also experience constant redirects to it which is why it is also referred to as Nextyourcontent.com Redirect. Apart from redirects and pop-ups, you will also start to see banners, in-text links, and other ads on the affiliated sites of Nextyourcontent.com Redirect. This is why aside from being a browser redirect, security experts tagged Nextyourcontent.com Redirect potentially unwanted programs.
No matter what website you visit, you will be bombarded with tons of sponsored content even when you are not actively browsing. This can get annoying especially when you are working on something but can’t focus due to the never-ending appearance of ads. Aside from pesky ads, this browser redirect can also track all your activities online to obtain your browsing data like the ads you’ve clicked, the website you often visit, search queries, browsing history, IP address, browser type, and so on. The data obtained is then used to produce more customized and personalized content.
How does Nextyourcontent.com Redirect circulate the web?
Nextyourcontent.com Redirect circulates the web using shady ads. However, if you frequently get redirected to this dubious site, then it only means that there is an adware program installed on your computer. Adware programs are distributed in free software packages like freeware and shareware which are offered on free sharing sites. Along with other unwanted programs, it is added as one of the optional programs in free software packages. Installing this kind of package is kind of tricky as you could end up installing all the programs in the package including Nextyourcontent.com Redirect. If you don’t want any unwanted programs from sneaking into your computer, you must use the Custom or Advanced setup instead of the standard one.
Removing this browser redirect isn’t as easy as you think so you need to follow the removal instructions given below to successfully remove it from your browser and computer.
Step_1: Close all the browsers affected by Nextyourcontent.com Redirect. If you’re having a hard time closing them, you can close them using the Task Manager just tap on Ctrl + Shift + Esc.
Step_2: Next, go to Processes and look for the process of the browser you’re unable to close as well as other dubious processes that could be related to Nextyourcontent.com Redirect and then right-click on each one of them and select End Process or End Task to kill their processes.
Step_3: Then open the Programs and Features section in Control Panel. To do so, tap the Windows key + R, then type in appwiz.cpl and then click OK or press Enter.
Step_4: From the list of programs installed, look for any suspicious programs that could be related to Nextyourcontent.com Redirect and then Uninstall them.
Step_5: Edit your Hosts File
- Tap the Win + R keys to open then type in %WinDir% and then click OK.
- Go to System32/drivers/etc.
- Open the hosts file using Notepad.
- Delete all the entries containing Nextyourcontent.com Redirect.
- After that, save the changes you’ve made and close the file.
Step_6: Reset all your browsers to default to their default state.
Mozilla Firefox
- Open Firefox and click the icon that looks like three stacked lines located at the top-right section of the browser.
- Next, select the question mark icon from the drop-down menu.
- Then select “Troubleshooting information” from the slide-out menu.
- After that, click on the “Reset Firefox” button located at the top-right section of the newly opened web page.
- Now select “Reset Firefox” in the confirmation pop-up window that appears.
Google Chrome
- Open Google Chrome, then tap the Alt + F keys.
- After that, click on Settings.
- Next, scroll down until you see the Advanced option, once you see it, click on it.
- After clicking the Advanced option, go to the “Restore and clean up option and click on the “Restore settings to their original defaults” option to reset Google Chrome.
- Now restart Google Chrome.
Internet Explorer
- Launch Internet Explorer.
- Next, click the wrench icon for Settings.
- Then click Internet Options.
- After that, go to the Advanced tab.
- From there, click the Reset button. This will reset Internet Explorer’s settings to their default condition.
- Now click OK to save the changes made.
Step_7: Hold down Windows + E keys simultaneously to open File Explorer.
Step_8: Navigate to the following directories and look for suspicious files associated with Nextyourcontent.com Redirect as well as the adware program that’s behind it and delete it/them.
- %USERPROFILE%\Downloads
- %USERPROFILE%\Desktop
- %TEMP%
Step_9: Close the File Explorer.
Step_10: Empty the Recycle Bin and afterward, you have to flush the DNS cache. To do that, just, right-click on the Start button and click on Command Prompt (administrator). From there, type the “ipconfig /flushdns” command and hit Enter to flush the DNS.
Congratulations, you have just removed Nextyourcontent.com Redirect in Windows 10 all by yourself. If you would like to read more helpful articles and tips about various software and hardware visit fixmypcfree.com daily.
Now that’s how you remove Nextyourcontent.com Redirect in Windows 10 on a computer. On the other hand, if your computer is going through some system-related issues that have to get fixed, there is a one-click solution known as Restoro you could check out to resolve them.
This program is a useful tool that could repair corrupted registries and optimize your PC’s overall performance. Aside from that, it also cleans out your computer for any junk or corrupted files that help you eliminate any unwanted files from your system. This is basically a solution that’s within your grasp with just a click. It’s easy to use as it is user-friendly. For a complete set of instructions in downloading and using it, refer to the steps below
Perform a full system scan using Restoro. To do so, follow the instructions below.